“YORU” is an open-source sftware for animal behavior detection using an object detection. YORU classifies animal behavior as "behavior objects."
Support the development of YORU.
Sponsor©Copyright 2026 Hayato M. Yamanouchi
These guides cover the stable release (v1.1.2). If you are installing v2.0.0-beta.4, follow the Beta Guides instead. The beta does not use Google Chrome, and the procedure differs.
YORU can be installed in two ways:
Whichever you choose, read Prerequisites first. Neither uv nor conda can install these for you.
The YORU launcher is a web page served by Eel, which opens it in Google Chrome or Chromium. Eel looks for the browser here:
| OS | Where Eel looks for it |
|---|---|
| Windows | the App Paths\chrome.exe registry key |
| macOS | /Applications/Google Chrome.app, then Chromium.app, then mdfind |
| Linux | chromium-browser, chromium, google-chrome or google-chrome-stable on PATH |
If no browser is found, YORU stops at startup with:
EnvironmentError: Can't find Google Chrome/Chromium installation
Microsoft Edge is built on Chromium, but Eel does not find it. Safari is not supported. Only the launcher needs the browser: the training, evaluation, analysis and real-time windows are native windows.
Install the GPU driver. It has to support CUDA 12.x: 527.41 or newer on Windows, 525.60.13 or newer on Linux. Check the installed version with:
nvidia-smi
The CUDA toolkit is not required by either route. The PyTorch wheels carry their own CUDA runtime (cudart, cuBLAS and cuDNN are inside the torch package). Install the toolkit only if you need nvcc to compile CUDA extensions of your own, or want the profiling tools.
The CUDA Version that nvidia-smi reports is the highest version your driver supports, not the version in use. A driver reporting 13.x runs the CUDA 12.4 wheels without a toolkit installed.
Without a usable GPU, YORU runs on the CPU. Everything works, but more slowly.
Install the Xcode Command Line Tools before uv sync. Two dependencies (imgui and gevent) have no arm64 wheels and are compiled during the sync:
xcode-select --install
pynput) or screen capture (Screen Recording, via mss). The prompts are for the terminal application you launched YORU from. Grant them in System Settings > Privacy & Security, then relaunch.uv builds the environment from the pyproject.toml and uv.lock in the repository. It picks the right PyTorch build for your platform: the CUDA wheels on Windows and Linux, and the MPS-enabled build on macOS. You do not need a system Python or conda, because uv downloads Python 3.10 for the project.
Install uv.
Windows (PowerShell):
winget install --id=astral-sh.uv -e
macOS / Linux:
curl -LsSf https://astral.sh/uv/install.sh | sh
brew install uv also works on macOS. The uv installation guide lists the other installers. Open a new terminal afterwards so that uv is on PATH.
Download or clone the YORU project.
 cd "Path/to/download"
 git clone https://github.com/Kamikouchi-lab/YORU.git
If you do not have git, you can download the ZIP from GitHub instead.
Build the environment.
 cd YORU
 uv sync
The first sync downloads PyTorch and takes a few minutes.
Run YORU from the repository root. The launcher looks for web/ and config/ relative to the working directory.
uv run yoru
uv run python -m yoru does the same thing. There is no uv init step: the project is already initialised.
To check that the GPU was picked up:
uv run python -c "import torch; print(torch.cuda.is_available())"
Check that Google Chrome is installed (see Prerequisites).
Check the installation of Miniconda.
Anaconda’s TERMS OF SERVICE was changed. If you use Anaconda in an organization that has two hundred (200) or more employees or contractors, you have to be careful.
Currently, you can use miniconda freely.
Download or clone the YORU project.
a. Install git
conda install git
b. Clone the repository
 cd "Path/to/download"
 git clone https://github.com/Kamikouchi-lab/YORU.git
Install the GPU driver. The CUDA toolkit is not needed: the PyTorch wheels in step 7 carry their own CUDA runtime, so the cu118 / cu121 choice there only has to be one that your driver supports.
Create a virtual environment using YORU.yml in the command prompt or Anaconda prompt.
conda env create -f "Path/to/YORU.yml"
The environment file pins Python 3.10 (v1.1.1 used Python 3.9). If you are upgrading from v1.1.1, recreate the environment:
conda env remove -n yoru, then create it again.
Activate the virtual environment in the command prompt or miniconda prompt.
conda activate yoru
Install PyTorch for a CUDA version that your driver supports.
pip install torch==2.4.1 torchvision==0.19.1 torchaudio==2.4.1 --index-url https://download.pytorch.org/whl/cu118
pip install torch==2.4.1 torchvision==0.19.1 torchaudio==2.4.1 --index-url https://download.pytorch.org/whl/cu121
(torch, torchvision and torchaudio will be installed.)
RTX 50-series (Blackwell) cards need a newer build. See working-example.md in the repository, which records a working RTX 5070 Ti setup on torch 2.8.0+cu128.
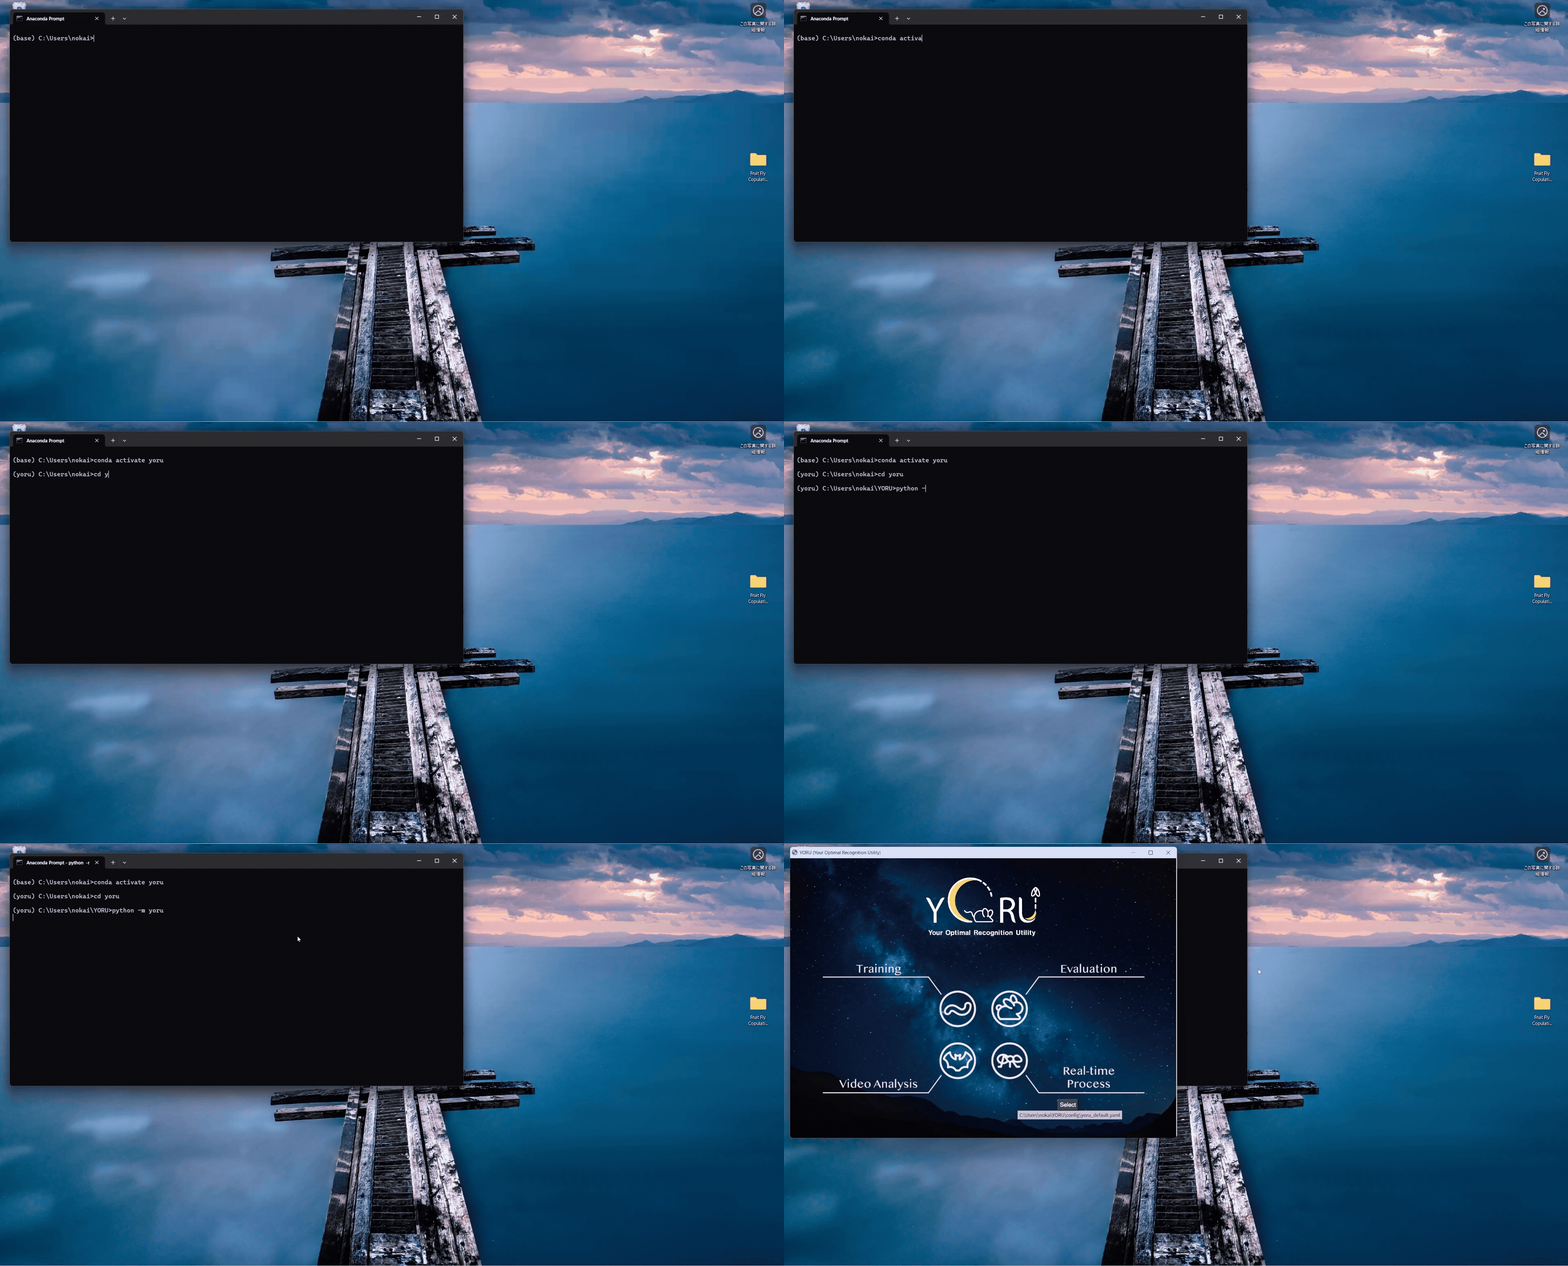
Run YORU in a command prompt or miniconda prompt.
 conda activate yoru
 cd "Path/to/YORU/project/folder"
 python -m yoru
YORU picks its compute device automatically, in this order: CUDA, then Apple MPS, then the CPU.
To choose the device yourself, set the YORU_DEVICE environment variable before launching (cuda, mps, cpu, or a CUDA index such as 0), or use the Device selector in the Training GUI:
YORU_DEVICE=cpu uv run yoru
On Windows, run set YORU_DEVICE=cpu before the launch command.
YORU_DEVICE applies to YOLOv8, YOLO11, RT-DETR and the torchvision detectors. YOLOv5 inference loads through torch.hub, which always uses CUDA when it is available and the CPU otherwise.YORU_DEVICE=cpu.YORU writes runtime errors and work logs to a user directory:
| OS | Log file |
|---|---|
| Windows | %USERPROFILE%\.yoru\logs\yoru.log |
| macOS / Linux | ~/.yoru/logs/yoru.log |
The log holds the full traceback of every error that the GUIs catch, so attach it when you report a problem on GitHub Issues. Set the YORU_HOME environment variable to move the directory somewhere else.