
“YORU” is an open-source sftware for animal behavior detection using an object detection. YORU classifies animal behavior as "behavior objects."
Support the development of YORU.
Sponsor©Copyright 2026 Hayato M. Yamanouchi
Applies to v2.0.0-beta.4. For the stable v1.1.2 procedure, see the User Guides.
Run the YORU’s Training sub-module.
Create a project folder. (Step0)
Folders and a condition yaml file will be created.
New in Beta 3 — Oriented Bounding Box (OBB). Tick this box before creating the project if your animals are elongated and lie at every angle (a fly, a larva, a fish). The project is then labelled, trained and run with rotated boxes instead of upright ones. See Oriented bounding boxes (OBB) below.
The choice is written into the project’s
config.yamlastask: obb(task: detectotherwise). It cannot be changed afterwards without relabelling, because the two label formats are different.
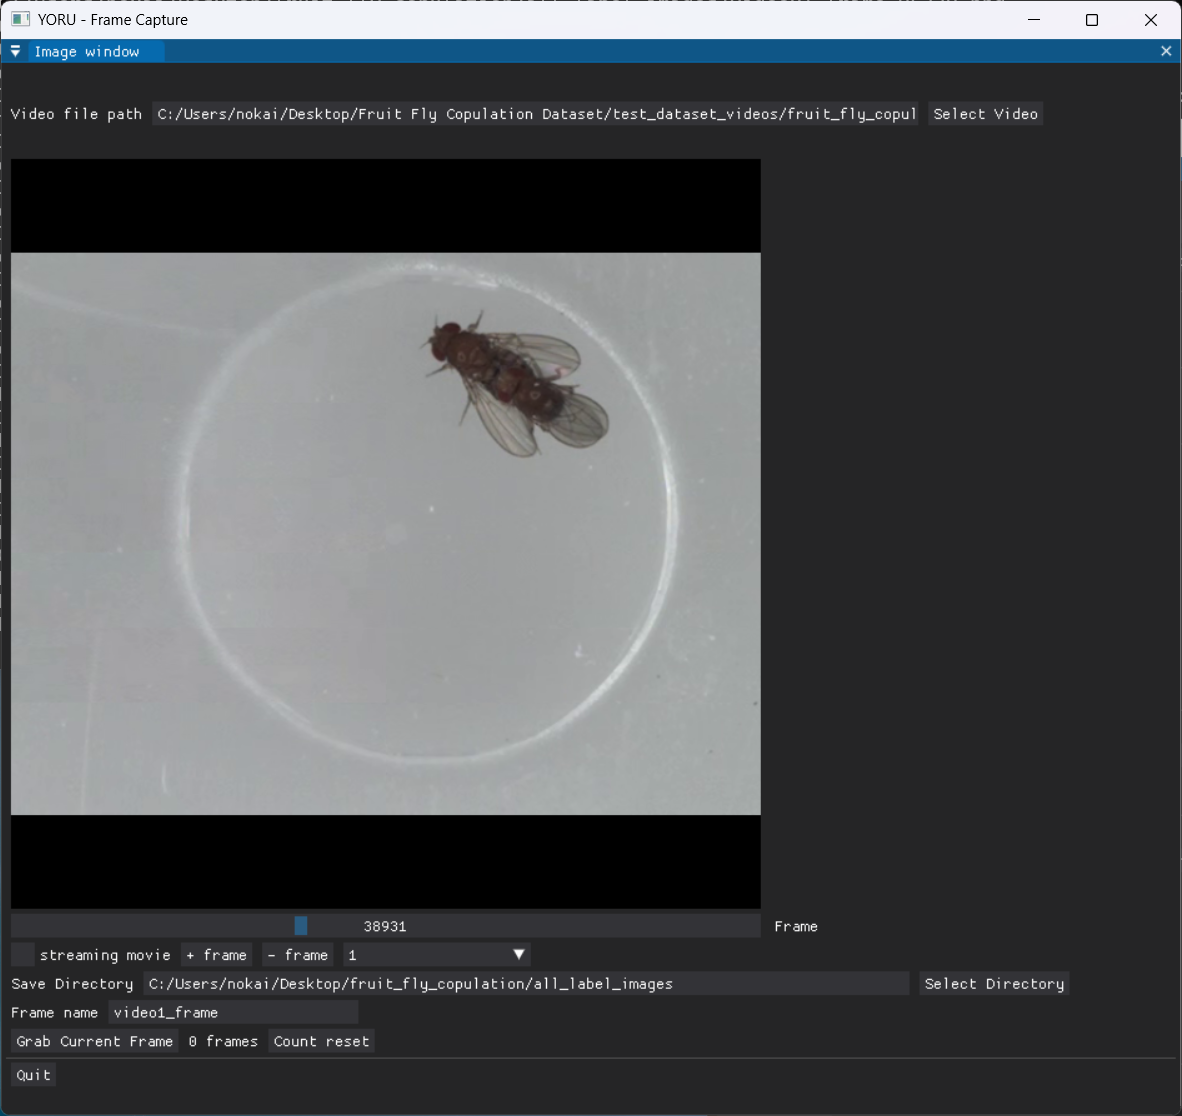
Extract frames for labeling using Grab GUI. (Step1)
I. Select a video in the Video file path in the Grab GUI.
Ⅱ. Select Save directory. (Basically, all_label_images in the project folder is a good choice.)
Ⅲ. Decide the grabbed frame name. (If you leave it blank, the video’s file name is used.)
IV. Cut out the screenshot, by hand or automatically.
i. Play video with Streaming movie.
ii. Arrow keys to go forward and back.
iii. Grab Current Frame or Alt key to save frame.
iv. Or pick a whole set of frames at once with Automatic Extraction (new in Beta 3).
Left / Right / Alt are normal window shortcuts and only fire when the YORU window has focus (changed in Beta 2).
Fixed in Beta 3: Frame Capture silently saved nothing into folders with Japanese (non-ASCII) names. Such folders now work.
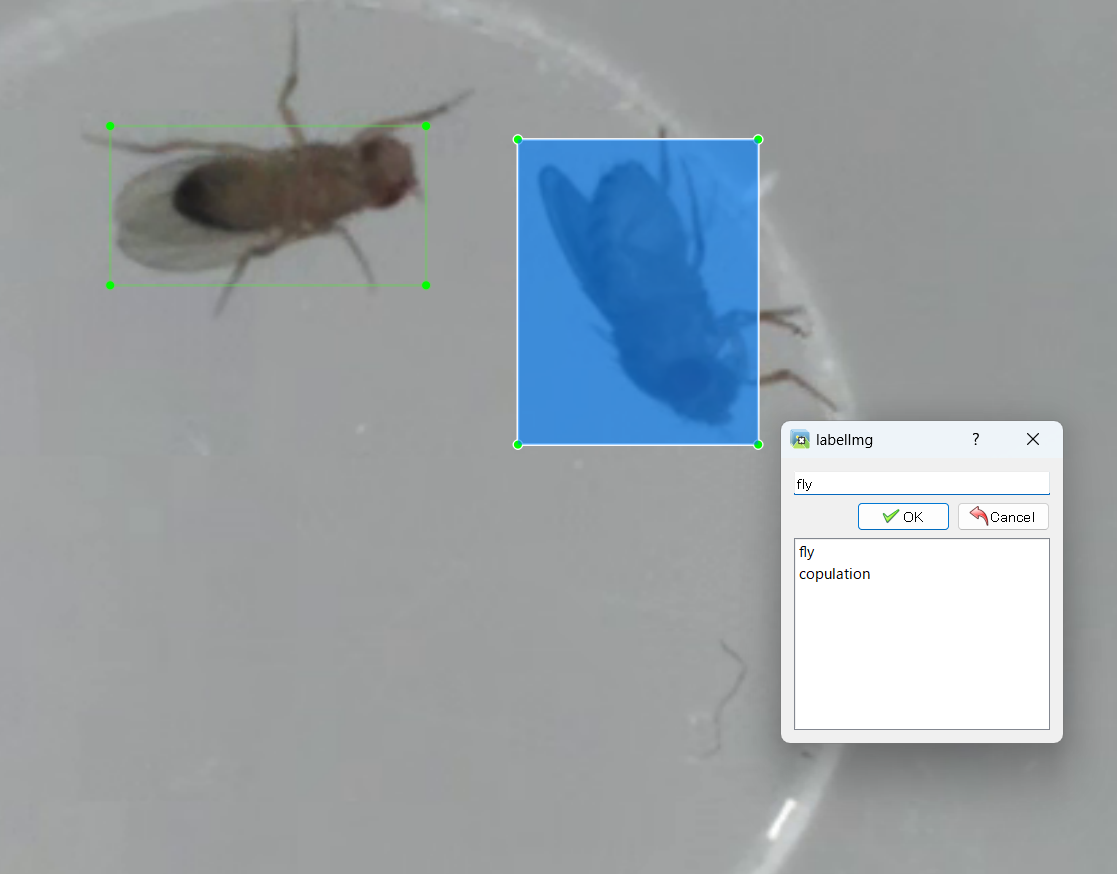
Push “Run LabelImg” and label the frames. (Step2)
Changed in Beta 3: YORU opens its own copy of LabelImg, already pointed at the project’s
all_label_imagesfolder and itsclasses.txt, and already in the format the project needs — YOLO for an ordinary project, YOLO-OBB for an OBB one. You no longer set the save format by hand.
Two tools are new: Click to Box and, in OBB projects, rotated boxes. The general LabelImg documentation is at LabelImg.
It is easier to label if Auto Save mode is turned on in the View tab.
Move all images and txt files to the “all_label_images” folder of the project. (Step3)
Push the “Move Label Images” button. (Step4)
Images and text files are copied to the train and val folders in a 4:1 ratio.
The split is deterministic (seeded), and
.jpg/.jpeg/.bmp/.tif/.tiffdatasets are handled as well as.png(changed in Beta 2). Do not re-split a project mid-experiment — the split will differ from the one Beta 1 produced.
Select the classes.txt file and push “Add class info in YAML file”. (Step5)
The information in classes.txt will be entered into the config.yml file.
Check the “YAML Path” and select training conditions — model, epochs, Image Size, Batch and Device.
Changed in Beta 4: a new project starts on YOLOv5 (
yolov5s.pt), as in YORU v1, instead of YOLO11. Choose another version here if you want one. See YOLOv5.
In an OBB project, the model family is fixed to YOLO, the version to YOLOv8 or YOLO11, and the weight gets an
-obbsuffix (for exampleyolo11s-obb.pt).
Device is
auto(CUDA, then Apple MPS, then CPU),cuda,mpsorcpu. See Install.
Check the GPU memory estimate, then start training by pushing “Train Model”. (Step6)
See GPU memory estimate and Stopping a run below.
In the terminal, you should check the initiation of training. If training fails, a popup shows the last lines of the training output.
New in Beta 3. Instead of looking for frames one at a time, Automatic Extraction in the Frame Capture (Grab) GUI picks a whole set at once, the way DeepLabCut’s extract_frames does.
uniform or kmeans).The frames are written into the same folder, with the same names, as the ones grabbed by hand. Stop interrupts a run and keeps what it has already saved.
| Algorithm | How it works | When to use it |
|---|---|---|
| uniform | Draws frames at random from the range. Instant, and the sample mirrors how often each behaviour happens. | The behaviour you are labelling is common. |
| kmeans | Shrinks every frame to a thumbnail, clusters the thumbnails by appearance and takes one frame per cluster. It reads the range once, so it takes a few seconds per thousand frames. | The behaviour is rare, or a uniform sample came back looking all the same. |
0.25 to 0.75 is the middle half. Use it to skip the handling at the start of a recording, or to keep the end of a video back as unseen test material for Evaluation.Known issue: files are named
<frame name>_<frame number>.png. A second run over the same range rewrites the frames that overlap, and the saved-frame counter counts them twice. Give each video its own frame name when several videos share one output folder.
New in Beta 3. Instead of dragging a rectangle around each animal, press C (or the Click to Box button) in LabelImg and click once on the animal. A box is fitted to its body and given the current label.
New in Beta 3. In an OBB project a box can be turned to lie along the animal:
| Key | Action |
|---|---|
Z / X |
Turn the selected box 1° left / right |
Shift+Z / Shift+X |
Turn it 15° left / right |
class x1 y1 x2 y2 x3 y3 x4 y4 (four corners, normalised) — the format ultralytics reads for task="obb". The file extension is .txt, the same as ordinary YOLO labels; LabelImg tells the two apart by counting the numbers on a line.| Stage | Ordinary project | OBB project |
|---|---|---|
config.yaml |
task: detect |
task: obb |
| LabelImg format | YOLO (class cx cy w h) |
YOLO-OBB (class x1 y1 … y4) |
| Weight | yolov5s.pt (default) or e.g. yolo11s.pt |
yolo11s-obb.pt |
| Model families | all of them | YOLOv8 / YOLO11 only |
| Real-time / analysis drawing | upright rectangle | rotated rectangle |
*_detect.csv |
… total_time, cx, cy, w, h, angle (angle = 0) |
… total_time, cx, cy, w, h, angle |
Detection needs no special setting: leave yolo_model_type: "auto" and YORU recognises an OBB model by itself.
Keep ordinary (5-field) label files out of OBB projects. In an OBB session, opening an axis-aligned label file switches LabelImg to plain YOLO, and boxes saved after that lose their angle. Check the format button in LabelImg’s toolbar if in doubt.
Changed in Beta 4: the Evaluation sub-module scores OBB models by the rotated boxes themselves. See Evaluation.
The beta selects a backend through a plugin registry (yoru/libs/plugins/):
| Backend | Models |
|---|---|
yolov5 |
YOLOv5, run by the bundled YOLOv5 code as in v1 (new in Beta 4) |
ultralytics |
YOLOv8 / YOLO11 (including -obb weights), and ultralytics’ YOLOv5u |
rtdetr |
RT-DETR |
torchvision |
Faster R-CNN / Mask R-CNN / SSD |
onnx |
.onnx exports (inference only) |
auto |
Picks one from the weights file |
auto does not unpickle the checkpoint to identify it. It reads the module names a YOLOv5 checkpoint was saved with, then the file name and, if needed, the class-name table out of the archive. A v1 weight named best.pt therefore reaches the YOLOv5 backend without being renamed.New in Beta 4 (Betas 2 and 3 could not use YOLOv5). YORU bundles upstream YOLOv5 — the anchor-based model from ultralytics/yolov5 that YORU v1 trained with — in yoru/libs/yolov5/. It is a first-class backend and the default for a new project: training, real-time detection, analysis and evaluation all work with it, and nothing has to be exported.
yolo_model_type: "yolov5" in the condition file, or leave it on auto. The boxes are the same as in v1: on three v1 models every box matched exactly, and with the same confidence threshold video analysis agrees with v1, tracking IDs included.yolov5s.pt and friends). Ultralytics’ YOLOv5u (yolov5su.pt) puts the same backbone under YOLOv8’s anchor-free head; it has different weights and a different output format, and it runs on the ultralytics backend. YORU tells them apart by the u in the file name.YORU_YOLOV5_RGB=1 before launching (set YORU_YOLOV5_RGB=1 on Windows). The order in use is printed and written to yoru.log each time a model loads.A
.ptfile runs code when it is opened. Loading a YOLOv5 checkpoint means unpickling it, which executes whatever the file says to. Train your own weights, or get them from someone you trust.
Step 6 shows a live line such as:
~9.4 GB needed / 7.6 GB free (NVIDIA RTX 4070)
Known issue: the warning still appears when Device is set to
cpu. Choose Train anyway.
best.pt and last.pt stay usable..yoru_stop_request file in the project directory.Results go to exp_<model>/ (changed in Beta 2):
| Backend | Weights |
|---|---|
| YOLOv5 | <project>/exp_yolov5s/weights/best.pt |
| YOLO / RT-DETR | <project>/exp_yolo11s/weights/best.pt |
| YOLO OBB | <project>/exp_yolo11s-obb/weights/best.pt |
| torchvision | <project>/exp_fasterrcnn/fasterrcnn_best.pt |
exp_yolo11s2, exp_yolo11s3, … so retraining does not overwrite earlier weights, and checkpoints are not written into the training-image folder.train/ folders from earlier versions are untouched. Update any scripts or notes that point at <project>/train/weights/best.pt.python is not the environment’s interpreter.This occurs when the mini-batch during training exceeds the GPU’s memory capacity. Try a smaller batch size — the GPU memory estimate warns about this before the run starts, and offers the largest batch expected to fit.
OBB dataset incorrectly formatted.The dataset mixes ordinary (5-field) and OBB (9-field) label files. Relabel the ordinary files as rotated boxes in the OBB session, or remove them from the dataset.